Approaching Reactivity with Discipline — II
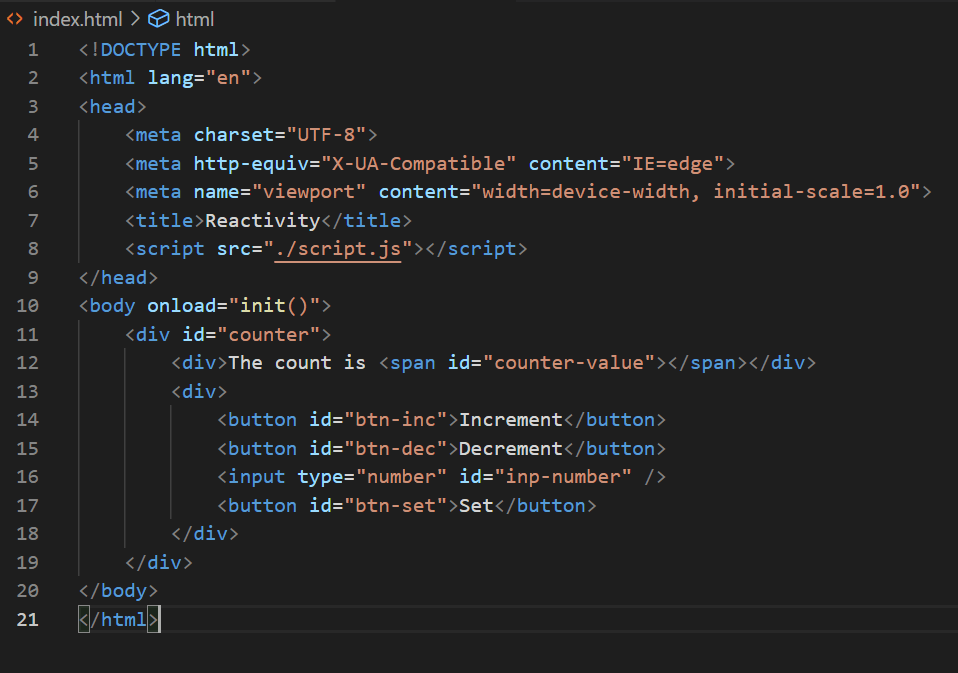
Table of contents

Developing reactive interfaces from the ground up (2/3)
Previously, we wanted to find out where the issue of reactivity is, and what other parts of the development process it affects. Here, we will take a look at approaching the issue.
We actually can develop reactive interfaces without a library or framework. If we replace a library’s or a framework’s declarative nature with structured and cohesive UI updates, we can achieve reactivity and still scale to a reasonable size. This isn’t to be thought of as a trade-off between reactivity and productiveness, instead, it’s a trade-off between reactivity and generic bloat (the generic bloat intended to make our lives easier by claiming to allow us on concentrating on actual application logic). And the good part is that we have been doing it all along since the invention of the Internet, it’s just that either time or money refrained us from approaching complexity through discipline.
Let’s take a Hello World example of a counter, and see how we can achieve a reactive interface.
N.B.: One might immediately say that an example using a ‘counter’ is absurd, because it’s not real-world and does not speak much. Well, this article is not, and never will be, a documentation. The purpose is to show that given proper domain knowledge and having proper technical proficiency, one can achieve reactivity without any dependency.
Basic Setup
The first thing to do is decouple the logic from the UI (as if this was never known to us).
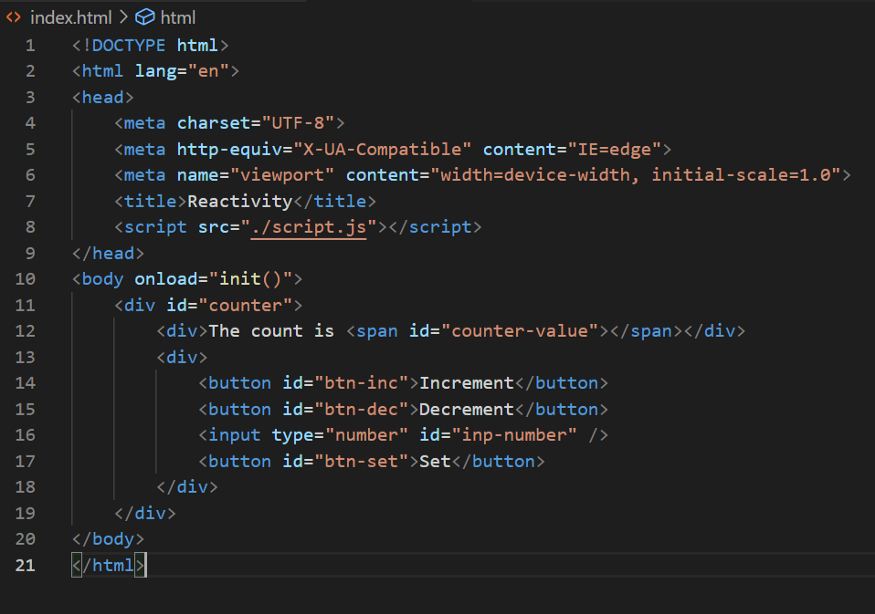
Some things to observe:
1. Line 11: This will be treated as a component in isolation
2. Line 12: the <span> tag contains no content
3. No event handlers are attached to any buttons
4. The id’s will play an important role in associating actions and values from DOM to the state and vice-versa
5. All the associations will happen once init() is called.
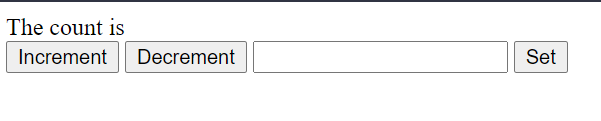
This is what the basic UI looks like:
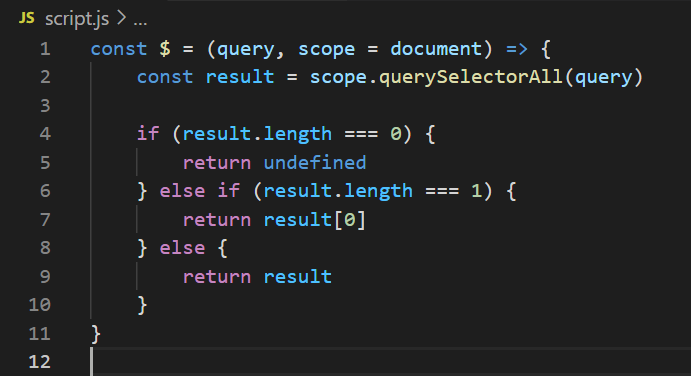
Similarly, a bit of housekeeping in script.js.
Signals and Events
A disciplinary approach to the code structure for reactivity is to think of interactions in the form of signals. Each signal is independent of each other and consists of three parts: the update(), the render(), and some functions performing some side-effects. And this is the key to cohesively emulate reactivity by rendering only the parts of DOM that should logically listen and respond (update) to that particular signal.
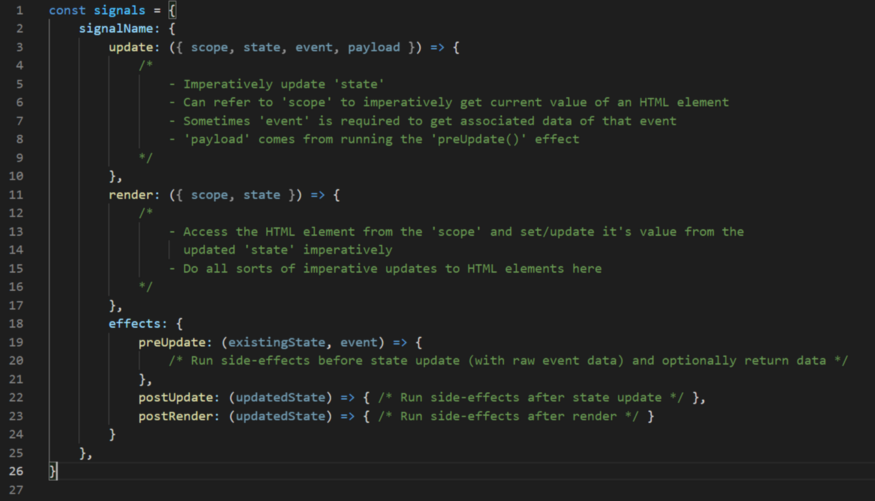
However, signals alone aren’t enough. They have to be attached to the DOM elements through actual DOM events. They must also be localized to the component scope.
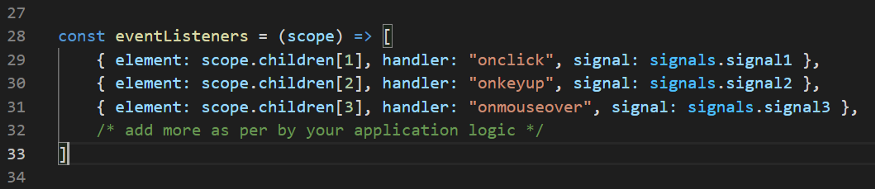
The Component
Now, we need to hook up the event listeners to a component. But before we do, we have to define a component.
Let’s break it down:
1. ref refers to the HTML node’s reference in the DOM. In our case, it’ll be the div having id as “counter”
2. We pass in an initialState with default value of having no attributes
3. We pass in event listeners with default value of an empty array
4. Line 36: We pass in the ref that translates to the scope of all the events the component and its children are supposed to act on
5. Line 37: This is where we attach the signals on the respective HTML elements’ event handlers
6. Line 40: We pass in an initial signal which will be processed by the process() function to reflect the initialState data in the UI
The process() function is the actual brain of this signal-oriented architecture.
.png)
Quite a lot is going on. Let’s break it down:
1. Line 25: A preUpdate() is run with the existing state. This is a place where you can do certain pre-computations, or gather data from other parts of the program or make a network call, and the like
2. Line 27: This destructively updates the state value of the component (with additional payload from the preUpdate() function, if required or available)
3. Line 29: postUpdate() runs after the state update has been completed. Possible actions here could be logging some data, or debugging in dev environment, and the like
4. Line 31: render() actually renders the latest component state, by updating the DOM imperatively and specifically as is provided by the current signal
5. Line 33: postRender() runs certain side-effects as a result of render(), and the like
The entire process() function should be viewed as an atomic operation.
This processing is the most basic and straightforward yet maintainable way of emulating reactivity in the UI, and can actually be extended to other GUI/CLI environments.
Finally, our setup is now complete.
!! Word of Caution !!
You might not actually need to store state at all.
As mentioned earlier, all our interactions with the DOM are imperative and specific. We know what parts of the DOM a signal should affect. All we have done is tame the chaos by structuring/abstracting imperative DOM accesses through signals.
This granularity is a far cry from generic re-renders of other frontend frameworks/libraries. They have no idea about your application logic. So it is justified that they do what they are good at, which is for their respective V-DOM implementation(s) to destroy/update existing DOM node(s) and replace the existing node(s) (in the entire component hierarchy) to reflect the new state in a generic fashion.
I must again remind you: our signal-oriented approach is not a replacement for existing libraries and frameworks. As such, the same thought process of maintaining state elsewhere or imperative access/updates might not work, or worse, might not even benefit you at all.
One important thing to note: all <code><input></code> elements maintain their own state values. So it is up to you whether you want to explicitly store the same state in an external state object, or perform side-effects by directly accessing the DOM node(s) imperatively. Also, an external state might probably be better suited at places where some non-visual logic needs to reside and which affects computations of one/other components (e.g. getting a list of users and storing them, or storing data of a logged-in user and showing them in the dashboard, and the like).
The popularity of external state storage has provided at least one advantage in disguise. Actual application/business logic need not be concerned of accessing data from heterogenous source(s) (e.g. document, DOM, URL, history, location, etc.) and can instead just concentrate on performing the task they are assigned, with such data otherwise maintained in the external state object.

Head on to the Approaching reactivity with discipline iii next and final part of this series to see how to set up signals and events for the counter component, and get to look at a demo video.
Developing reactive interfaces from the ground up (2/3)
Previously, we wanted to find out where the issue of reactivity is, and what other parts of the development process it affects. Here, we will take a look at approaching the issue.
We actually can develop reactive interfaces without a library or framework. If we replace a library’s or a framework’s declarative nature with structured and cohesive UI updates, we can achieve reactivity and still scale to a reasonable size. This isn’t to be thought of as a trade-off between reactivity and productiveness, instead, it’s a trade-off between reactivity and generic bloat (the generic bloat intended to make our lives easier by claiming to allow us on concentrating on actual application logic). And the good part is that we have been doing it all along since the invention of the Internet, it’s just that either time or money refrained us from approaching complexity through discipline.
Let’s take a Hello World example of a counter, and see how we can achieve a reactive interface.
N.B.: One might immediately say that an example using a ‘counter’ is absurd, because it’s not real-world and does not speak much. Well, this article is not, and never will be, a documentation. The purpose is to show that given proper domain knowledge and having proper technical proficiency, one can achieve reactivity without any dependency.
Basic Setup
The first thing to do is decouple the logic from the UI (as if this was never known to us).
Some things to observe:
1. Line 11: This will be treated as a component in isolation
2. Line 12: the <span> tag contains no content
3. No event handlers are attached to any buttons
4. The id’s will play an important role in associating actions and values from DOM to the state and vice-versa
5. All the associations will happen once init() is called.
This is what the basic UI looks like:
Similarly, a bit of housekeeping in script.js.
Signals and Events
A disciplinary approach to the code structure for reactivity is to think of interactions in the form of signals. Each signal is independent of each other and consists of three parts: the update(), the render(), and some functions performing some side-effects. And this is the key to cohesively emulate reactivity by rendering only the parts of DOM that should logically listen and respond (update) to that particular signal.
However, signals alone aren’t enough. They have to be attached to the DOM elements through actual DOM events. They must also be localized to the component scope.
The Component
Now, we need to hook up the event listeners to a component. But before we do, we have to define a component.
Let’s break it down:
1. ref refers to the HTML node’s reference in the DOM. In our case, it’ll be the div having id as “counter”
2. We pass in an initialState with default value of having no attributes
3. We pass in event listeners with default value of an empty array
4. Line 36: We pass in the ref that translates to the scope of all the events the component and its children are supposed to act on
5. Line 37: This is where we attach the signals on the respective HTML elements’ event handlers
6. Line 40: We pass in an initial signal which will be processed by the process() function to reflect the initialState data in the UI
The process() function is the actual brain of this signal-oriented architecture.
Quite a lot is going on. Let’s break it down:
1. Line 25: A preUpdate() is run with the existing state. This is a place where you can do certain pre-computations, or gather data from other parts of the program or make a network call, and the like
2. Line 27: This destructively updates the state value of the component (with additional payload from the preUpdate() function, if required or available)
3. Line 29: postUpdate() runs after the state update has been completed. Possible actions here could be logging some data, or debugging in dev environment, and the like
4. Line 31: render() actually renders the latest component state, by updating the DOM imperatively and specifically as is provided by the current signal
5. Line 33: postRender() runs certain side-effects as a result of render(), and the like
The entire process() function should be viewed as an atomic operation.
This processing is the most basic and straightforward yet maintainable way of emulating reactivity in the UI, and can actually be extended to other GUI/CLI environments.
Finally, our setup is now complete.
!! Word of Caution !!
You might not actually need to store state at all.
As mentioned earlier, all our interactions with the DOM are imperative and specific. We know what parts of the DOM a signal should affect. All we have done is tame the chaos by structuring/abstracting imperative DOM accesses through signals.
This granularity is a far cry from generic re-renders of other frontend frameworks/libraries. They have no idea about your application logic. So it is justified that they do what they are good at, which is for their respective V-DOM implementation(s) to destroy/update existing DOM node(s) and replace the existing node(s) (in the entire component hierarchy) to reflect the new state in a generic fashion.
I must again remind you: our signal-oriented approach is not a replacement for existing libraries and frameworks. As such, the same thought process of maintaining state elsewhere or imperative access/updates might not work, or worse, might not even benefit you at all.
One important thing to note: all <code><input></code> elements maintain their own state values. So it is up to you whether you want to explicitly store the same state in an external state object, or perform side-effects by directly accessing the DOM node(s) imperatively. Also, an external state might probably be better suited at places where some non-visual logic needs to reside and which affects computations of one/other components (e.g. getting a list of users and storing them, or storing data of a logged-in user and showing them in the dashboard, and the like).
The popularity of external state storage has provided at least one advantage in disguise. Actual application/business logic need not be concerned of accessing data from heterogenous source(s) (e.g. document, DOM, URL, history, location, etc.) and can instead just concentrate on performing the task they are assigned, with such data otherwise maintained in the external state object.
Head on to the Approaching reactivity with discipline iii next and final part of this series to see how to set up signals and events for the counter component, and get to look at a demo video.
Give your product vision the talent it deserves
building your dream engineering team.


